


You can connect your AIS device to Aqua Map using a WiFi Connection to show on the map all the received AIS targets and have all the possible collisions automatically detected.
NOTE: It is necessary to have an active Advanced Tools subscription to enable the AIS integration.
AIS Settings
From the main Settings page, you can access the AIS Settings page. Here, you can view the list of all received AIS targets, configure AIS drawing, and enable AIS Collision detection.
At the top of this page, you will find the switch to enable the entire AIS functionality.

Then you will be presented with the following two groups:

- AIS targets list: Opens a new page displaying all the received AIS targets (refer to the AIS Targets Info section below).
- AIS friends list: Opens a new page listing all AIS targets currently received and designated as friends. You can mark a target as a friend in the Target Info page (see AIS Targets Info section below). When an AIS target is marked as a friend, it is instantly recognized as such each time it's received.
Configure the AIS display
The first main group allows you to select how to display the AIS targets on the map.

- Show on Map: enables the display of AIS targets on the map.
- Show AIS Class: allows selection of which classes of AIS targets to display on the map.
NOTE: AIS data is divided into two classes – Class A and Class B – depending on the AIS transponder transmitting the information. - Show moored/lost boats: enables the display on the map of AIS targets that are currently Moored or Lost (not receiving data for more than 3 minutes).
- Show ATONs: enables the display of targets that are ATONs (Aids TO Navigations), which can be real or virtual. NOTE: available only on iOS.
- Timestick: selects the length (in time) of the course line for all AIS targets. If you select 5 min, the top of the course line will represent the position of the target after 5 min (if it follows the current bearing with the current speed). The timestick line has a big mark every 5 min and a small mark every 1 minute (only for the first 10 minutes).
Collision avoidance
The next group allows you to define all the parameters used for automatic collision calculation.

- Collision avoidance: to activate alarms related to collision avoidance, including red flashing color for colliding targets, flashing red AIS boxes, and sound alarms.
- Minimum allowed CPA: to set the Closest Point of Approach (CPA), which is the minimum distance two boats will be if following the same direction and speed. This calculation is based on the time specified in the "Time to CPA" field. For example, if set to 350 ft, an alarm will be triggered if any boat is projected to be closer than 350 ft to our boat in the next 10 minutes. NOTE: The collision calculation considers the GPS position received and a hypothetical boat size (as the size of the boat in AIS data is often unknown or unreliable). Therefore, undetected collisions may occur, especially for larger boats.
- Time to CPA: to specify the maximum time in the future to search for potential collisions.
- Alarm sound: to choose the type of sound alarm for each detected collision.
- Volume: to adjust the volume of the selected alarm sound.
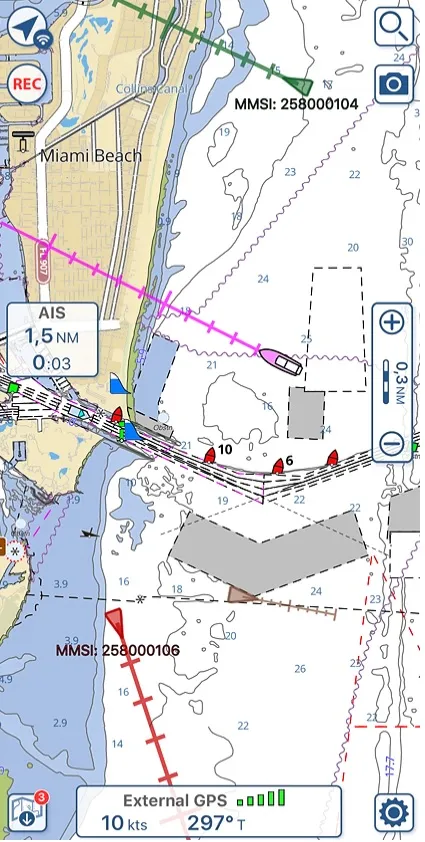
AIS on the map
Once your AIS device is connected (see Wi-Fi Connection) to Aqua Map, enabling the "Show on map" switch (as mentioned in the AIS Settings paragraph above) will overlay all received AIS targets (boats, ATONs, SARTs) onto the map.
The boat icon size corresponds to the AIS information received for each boat (larger icon for larger boats), while the color indicates the target's status: brown for normal, green for friend, red for tracked target, and flashing red for collision detected.
Each boat displays a course line, the length of which can be adjusted (in minutes) on the AIS setting page mentioned above. Depending on the boat's speed, the course line length will expand or contract accordingly.
Additionally, each AIS icon's transparency varies based on its distance from the current GPS position.
Here's an example of how AIS targets are represented on the map:
On the map, there will also be an AIS box located on the left side, providing real-time information about the Closest Point of Approach (CPA) and Time to Closest Point of Approach (TCPA) for the AIS boat target with the smallest (and therefore most critical) CPA.
If Collision Avoidance is activated, this box will begin flashing red when a collision is detected, based on the settings you configured in the AIS Settings page.
Please note: In the event of a detected collision (or collisions), the information in this window pertains to the target with the potential collision and the smallest TCPA.
Additionally: If one or more Search and Rescue Transponder (SART) targets are present, this window will display information for the SART target with the smallest TCPA, disregarding any colliding targets.
By tapping on the AIS box, you can directly access the list of all AIS targets, the same list accessible from the AIS Settings page.
AIS Target info
You can access the AIS target info page in two different ways:
1. Tap on the AIS target icon on the map to open a pop-up window. Then, select the appropriate button to open the Target info page.
2. From the Target list page, tap on the specific target button, and it will open the Target info page.
This is the AIS Target list.

Here you can:
- search and filter the targets by name,
- arrange the targets by CPA (Closest Point of Approach), by Distance, or by Name.
This is the AIS Target info page (it is green because this is a friend target).

In this page, you have:
- Target info: the list of the available target info plus the calculated CPA and TCPA.
- My friend: the switch to set a target as friend. NOTE: This info is stored in the app, and once a target is set as friend, it will always be automatically recognized as a friend when received.
From the bottom menu you can:
- set the target
 as tracked: This will cause the target to be drawn on the map in red (and without any transparency due to the distance).
 - center
on map the target: To close this page and zoom on the map centered on the target.
- delete
the target.
NOTE: This will remove the target from the current database, but in case the target is received again, it will reappear. So, you should only delete lost targets.

