


Route Explorer's goal is to provide boaters with easily accessible information necessary for smooth and safe navigation. By using Route Explorer, you can access all the important elements along your route or track, including distances and estimated times of arrival (ETAs). An excellent explanation was provided by Bob423 (many thanks to Robert Sherer) in "this article".
NOTE: It is necessary to have an active Advanced Tools subscription to have access to this feature.
Draw a new route or select one of your existing routes/tracks, and Route Explorer will automatically calculate:
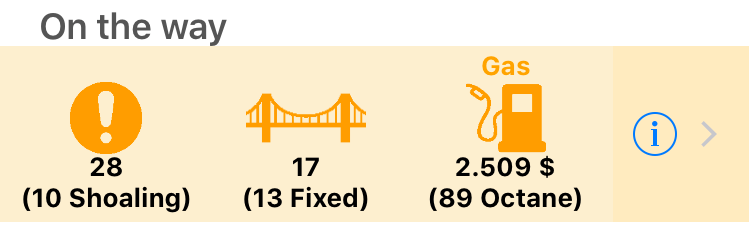
- All alerts and hazards (Waterway Guide/ActiveCaptain) along your route/track.
- All bridges and locks intersecting your route/track, determining which ones are potentially dangerous for your boat.
- All anchorages (ActiveCaptain and WaterwayGuide) along your route/track.
- All fuel stations (ActiveCaptain and Waterway Guide) with the selected fuel type along your route/track, highlighting the price when available and indicating the least expensive option.
- All marinas (ActiveCaptain and WaterwayGuide) along your route/track.
- The weather forecast along your route/track.
NOTE: Route Explorer's calculation is based on the details added to the My Boat page. Therefore, for dangerous bridges, the boat's beam and height are used, and for marinas with fuel, the Fuel Type option is considered.
Info page
Accessing the route or track page, you will see a dedicated row summarizing the hazards/alerts, bridges/locks, and fuel stations (compatible with the fuel you selected in the My Boat page) found.
Then, by tapping on the button, you will be able to access a detailed list containing all the important information along your route/track.

Each row displays: an icon identifying the type of object, the ETA (Estimated Time of Arrival), the distance from your GPS position, and a brief description. In the image above, you can also see the marina with the lowest fuel price (highlighted with an orange background).
If the route/track is not active (you are not navigating it) and you have not enabled the "Set start in the next 24 hours," then the distance is measured from the starting point,and instead of the ETA, you have the elapsed time from the starting point. Tap on the button to access the object details. Tap on the description to close the page and center the map on the selected object.
Preferences panel
At the top there is the "Preferences" panel that allows you to configure the Route Explorer info. In particular, the first part of the panel allows you to select which objects are considered in the Route Explorer calculation. NOTE: This will also affect the items displayed during navigation in the Route Explorer box.

Then there is a row that is only present if you are viewing track details and the track is not active (you are not navigating or recording it). It allows you to select which speed to use for the time calculation.

The following row allows you to select a simulated start time for the route/track. It is available only if the route/track is not active.

Setting the start time will also enable you to display the Weather forecast info.
Highlighted objects
You can highlight objects in the Route Explorer list by swiping left on the corresponding row and selecting the "Highlight" button.

Swiping again on the cell allows you to remove the highlight.

Highlighting an object (or multiple objects) will result in a new info box (see below paragraph "Info boxes") appearing on the map. This new info box will display information about the next highlighted object. This feature allows you to focus on specific elements such as a bridge, a hazard, or a marina, and stay informed about their distance and ETA.
NOTE: For tracks, you cannot highlight the waypoints (because they are not real waypoints but simulated ones).
Set starting point
NOTE: Available only on iOS.
For routes and tracks that are not active, swiping on waypoints allows you to set them as new "simulated" starting points.

Swiping again on the cell you can reset it.

When setting a new starting point, all the calculated information (distances, fuel consumption, etc.) will be referenced to the new starting point rather than to the complete track/route.
Info boxes
While navigating a route/track, in addition to the typical info box displaying the active route/track info (see Route page), you will see:
- A box named Highlighted objects, showing the next highlighted object (with relative distance and ETA) along the route/track you are navigating.
- Another box named Route Explorer info, showing the next hazard/alert, marina, and bridge/lock (with relative distance and ETA) along that route/track you are navigating.
On a tablet screen, you will see all boxes (standard box on the left, highlighted object in the center, and Route Explorer info on the right).

On smaller screens you will see one box at a time, displayed alternatively by the app. You can decide whether to let them looping or fix one of them on the screen using the ![]() button.
button.

Settings page
You can reach this page from the main Settings page.

Here you can enable the overlay of the special Route Explorer boxes on the map (while navigating a route/track) using the "Show info during navigation" switch.
You can also select the maximum distances for the main objects:
- The maximum distance for searching Hazards and Alerts.
- The maximum distance for searching Anchorages.
- The maximum distance for searching Marinas with Fuel.
- The maximum distance for searching Marinas without Fuel.

