


Route Planner is a multifunctional route planning tool that offers navigators enhanced control and flexibility. By combining Auto and Manual planning modes, Route Planner allows seamless switching between both modes within the same route, providing precise control over every route and segment.
In addition, you will have the ability to use the tracks and routes you have on your device to instruct the automatic route calculation to use your preferred routes. Aqua Map can also leverage information from local data (e.g. USACE Surveys or Coast Guard data) available in your area.
Downloading Required Chart Tiles
Before planning your route, make sure all necessary chart tiles for your journey are downloaded. Missing chart data will prevent the route from being calculated and a message will pop up if you try to add a waypoint on a missing tile. To download chart tiles, tap the Charts icon in the bottom-left corner to enter Grid View (see the Chart download help for more info).
Create a new route
To start creating a route simply long-press directly on the area on the charts where you want to place your first waypoint or tap on the charts and select the edit route icon ![]() on the left part of the pop-up. You will then see a new pop-up window to either ‘Start from’ or ‘Navigate to’.
on the left part of the pop-up. You will then see a new pop-up window to either ‘Start from’ or ‘Navigate to’.
- ‘Start from’ uses the waypoint as your starting point for the new route.
- ‘Navigate to’ uses the waypoint you have placed as the final destination of your route using as a starting point your current GPS location.
After you select the desired option a new route is created and you enter in the Route Planner mode.
When you are in the Route Planner mode the app will automatically:
- show the Route editing info page (see below for more details),
- show the AUTO/MANUAL button in the bottom part of the screen to switch between the 2 different modes,
- hide the Search icon and Camera icon.
Add and manage Waypoints
Waypoints
You can add a waypoint using the "Add Waypoint" button in the Route editing info page (see below for more info on the page) or when tapping on the map.
If you use the map to add a new waypoint, it is enough you long-press in the desired position or tap on the same position and select the left icon in the pop-up. In this way you will add a waypoint at the end of the editing route. You can also tap over any point of interest from Active Captain or Waterway Guide and select the same button to add a waypoint on that location.
To add a new waypoint not at the end of the route but somewhere in between you should tap on the route itself to split it, a pop-up will ask if you would split the route on that position and then you will be able to move the new created waypoint in the desired position.
All the waypoint added by the user are named User Waypoints and are listed in the Route editing info page (see below) and are drawn on the route itself with an specific symbol (only exception are the first waypoint
and the last waypoint
). Viceversa the waypoints automatically created by the app (to calculate the best route) are named Automatic Waypoints, are not listed in the Route editing info page and are displayed on the route with a much less obvious symbol
. You can transform an Automatic Waypoint into a User Waypoint by simply dragging it.
Delete a Waypoint
You can delete only User Waypoints and to do it you can tap on the Waypoint on the map and select the trash icon from the appearing pop-up or with the Route Editing info page by tapping on the Trash icon on the corresponding row.
Move a Waypoint
You can change the position only to User Waypoints and you can do it from the map, selecting and dragging the waypoint or from the Route editing info page (see below) by tapping on the coordinates field.
Auto vs Manual mode
The Route Planner allows to select the active planning mode with the AUTO/MANUAL button in the bottom-center part of the screen.
![]()
You can switch between the Auto and Manual planning modes within the same route. This hybrid routing capability enables users to customize and combine manual and automatic segments, providing precise control over every route leg.
To allow the user to understand which portion of the route has been done in Auto or in Manual mode, the 2 types of segment are drawn with a different color (same color of the corresponding AUTO and MANUAL selection):
 Auto segments appear in dark purple.
 Manual segments are shown in magenta.
making it easy to identify each planning mode at a glance.
 Auto mode
If you are interested in having automatically calculated routes, select the Auto mode and you are done. For each new waypoint you add in the route the app will automatically calculate the optimal path among the User Waypoints. You can add, delete, move the User Waypoints and each time the app will automatically recalculate the portion of the route that has been modified.
The app calculates the optimal path between the User Waypoints based on your vessel specifications and routing preferences as defined in the Route Planner setting page (see below for more details) and in the My Boat page. It is extremely important you check these pages before to do any calculation.
ATTENTION: The routes calculated automatically by the app are suggestions and must be carefully verified by the user. It is the user responsibility to use this function prudently and with caution.
Each time a new calculation is needed, the Route editing info page will display a "Calculating ..." label, a progress bar and a percentage of the calculation done. When the app is calculating you cannot interact with the screen except for the "Cancel" button in the Route editing info page that allows to interrupt the calculation.
If the app cannot calculate part of your route, you will see a pop-up notification stating: “Some parts of your route could not be calculated. Please check your Route Planner settings.” This could mean your vessel specifications don’t match the chart data or you are missing some chart tiles.
When you are in Auto mode the app checks, each time you enter a new waypoint, if the position is navigable (accordingly to your Route Planner settings) and in case it is not it will warn you with a "Non-navigable area" alert.
 Manual mode
If you are not interested in having automatically calculated routes, you can use the Route Planner in Manual mode, this will give you complete control over the route.
Even if you are in Manual mode and so you can modify your route as preferred, the app will check the added segments and waypoints to understand if you are editing a route over some hazardous areas (see Hazard calculation in the Route Editing info page below).

 Hybrid mode
With Aqua Map it is possible to use both modes for the same route, at any time of route editing you can switch from AUTO to MANUAL and viceversa as many times as you wish.
It is importanto to understand that whenever you change the planning mode, no part of the route is automatically changed. So, if you change from Manul to Auto, no part of the route is automatically recalculated and vice versa if you change from Auto to Manual all the automatically calculated part of the route will remain unchanged. The selected planning mode ONLY affects the actions done from that moment onwards.
This mix is quite powerful, but it is important to understand its logic in order to make the best use of it. The idea is that each modification made on the route has a different effect depending on whether you are in Auto or Manual mode:
- Auto mode: the app always recalculate the path from the added/moved/deleted User waypoint and the previous/next one User Waypoint, regardless of whether the previous and next segment were Auto or Manual segments.
- Manual mode: the app never recalculate any portion of the route in this mode, so if you add/move/delete a User Waypoint this will create a manual segment toward the previous and next waypoint (regardless of whether it is a User Waypoint or an Automatic Waypoint).
The idea behind this hybrid mode is to allow you to take advantage of automatic route calculation (greatly simplifying the job of route editing), but at the same time to allow you to carefully check the calculated route (always mandatory for safe navigation) and to modify it in areas where you feel you should follow a different route. Ideally, you should enter the starting and ending point in Auto mode (maybe some intermediate points in case you want a specific passage), then switch to Manual mode and, following the calculated route, make some manual changes where you decide to follow a different route than the one selected by the application.
Edit an existing route
To edit an existing Route you should tap on the Route in the map and select the Edit route icon on the left part of the pop-up.
If you edit an “old style” route, created in the past with Aqua Map or imported from another source, the route will be considered completely manual (all segments are considered manual segments), whereas if you edit a route created with the Route Planner all previous editing information is restored and it is as if you are simply continuing the previous editing session.
NOTE: In both cases, hazards are fully recalculated for the entire route to account for any map updates. In contrast, portions of the automatic route are not recalculated when you start editing a route.
Route editing info
As soon as you enter in the Route Planner mode a new window appears on the screen showing a summary of the editing Route info and giving the control over the editing.
There are 2 versions of this window, an extended version showing all the information of the route and a compact version with just a summary of the route info. You can easily switch from one to the other and depending if you are on a smartphone or on a tablet the default window shown is different.
On a smartphone the compact version is shown (this window is on the top-center part of the screen):

to switch to the extended version you can tap on the upper part of the window.
On a tablet the extended version is shown (this window is on the left side of the screen):
NOTE: on a smartphone the extended window is opened full screen.

- Selecting the icon
you will close the extended window and the compact window will appear. Closing the window will not stop the editing.
- Route name: here you see the default route name.You cannot change the default name until you save the route, at this point you can change the route name from the Route Info page.
- Distance, estimated duration and estimated fuel (based on the average speed and fuel consumption as defined in the My Boat page) for the editing route.
- A small phrase to remember to check your Route Pllanner settings; tapping on the link you open the corresponding page.

- Number of hazards along the route: this information is not present if no hazard is detected along the route. See below for more details on how the hazards are calculated and their meaning.
- The list of User Waypoints: here you have in sequence, from the first Waypoint on the top part to the last one on the bottom part, the list of all the User Waypoints along your route. Each row allows to make certain action on the corresponding Waypoint;
- Tapping on the waypoint icon on the left part you make the waypoint as selected (with a more prominent icon
) and centered on the map.
- Tapping on the coordinates field you can manually change the coordinates and set (or change) the waypoint name.
- Tapping on the trash icon you delete the waypoint.
- Tapping on the waypoint icon on the left part you make the waypoint as selected (with a more prominent icon

- Add waypoint button opens a dedicated page where you can search among most of the data in Aqua Map (see below for more info).
- SAVE button allows to end the editing of the route and save all the changes done. When you select this button you have the opportunity to only Save the route or to Save and immediately start the navigation.
- Cancel button terminates the editing without saving any change, the edited route is deleted, and if you were editing an existing route, it is restored to its original state.
Hazards calculation
The Route Planner is much more than an automatic route calculation and the calculation of the hazards along your route is one of these extra feature. Each time you make a change in your route and you are in Auto mode the app will automatically calculate the optimal route using an algorithm that search the shortest path with as few dangers as possible. Sometimes it is necessary to accept some compromises (especially if you select the Weak Safety checks option in the Route Planner settings) and so the calculated route could go through some dangerous areas, in this case the app will warn you creating an hazards section and listing all the found hazards.
An interesting feature of the Route Planner is that hazards are shown not only for the automatically calculated part of the route, but also for all Manual segments. Even if the route was created completely in Manual mode, the hazards are calculated so that any possible danger along the route can be easily identified.
The hazards are shown on the map using a specific symbol: . This symbol is placed in the center of the hazard area, while the portion of the route through the hazard area is drawn in a different color depending on the criticality of the hazard:
- Completely non-navigable segments are displayed in gray with the warning "You cannot pass". The automatically calculated route will never pass through areas like this, except for the first small initial and final portions of the route, to allow to reach destinations that are not on the water (e.g. Marina restaurant).
- Segments that are very hazardous to navigation are displayed in orange with the warning: "Very critical". The automatically calculated route will never pass through areas like these if you selected the Strong Safety checks option in the Route Planner settings. Hazards like this have two different causes:
- "shallow water": means the route is passing through waters with a depth that could be very dangerous for the boat. For example, if you have a draft setting of 2m and the depth area has a range of 1.5m to 3m. In some areas the depth area information provided by the Hydrographic Office is relatively vague, you can have areas with a range from 0m to 5m, clearly if we apply a strict safety rule no boat can cross these areas because the minimum possible depth within the area is 0m. This is one of the reason we introduced the Weak Safety checks, to allow to move through these areas as well.
- "low clearance": means the route is passing under something (bridge, cable, ...) that does not declare its clearance.
- Segments dangerous to navigation are displayed in yellow with the warning: "Danger: low clearance". These segments of the route are passing under an opening bridge that must be opened to allow your boat passage.
- Segments that could be hazardous to navigation are displayed in yellow with the advise: "Pay attention: low clearance". These route segments are passing under a bridge (or cable) whose clearance is sufficient to allow the boat to pass, but with a relatively small margin that requires attention.
Other than on the map you can check the hazards present in your route using the hazards page accessible from the dedicated section in the Route edit info page:
![]()
Selecting the row will open the Hazard info page:
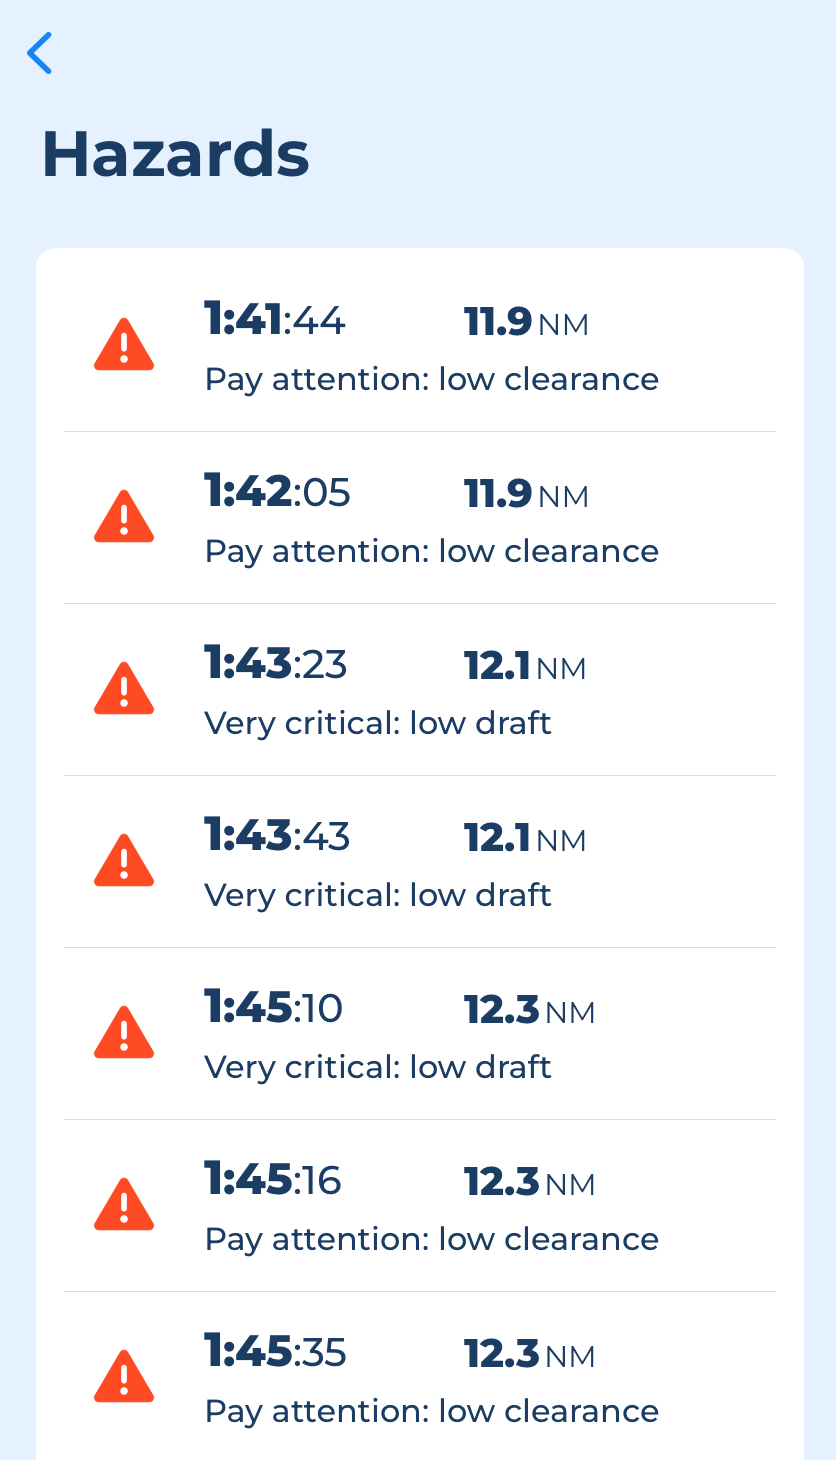
Here you have for each detected hazard:
- Time from the start (considering average speed as defined in the My Boat page).
- Distance from the start.
- Description of the hazard.
Tapping on a row will center the map on the corresponding hazard.
Add waypoint
If you select the Add Waypoint button you open a dedicated page to search for specific POIs or choose from your existing markers.
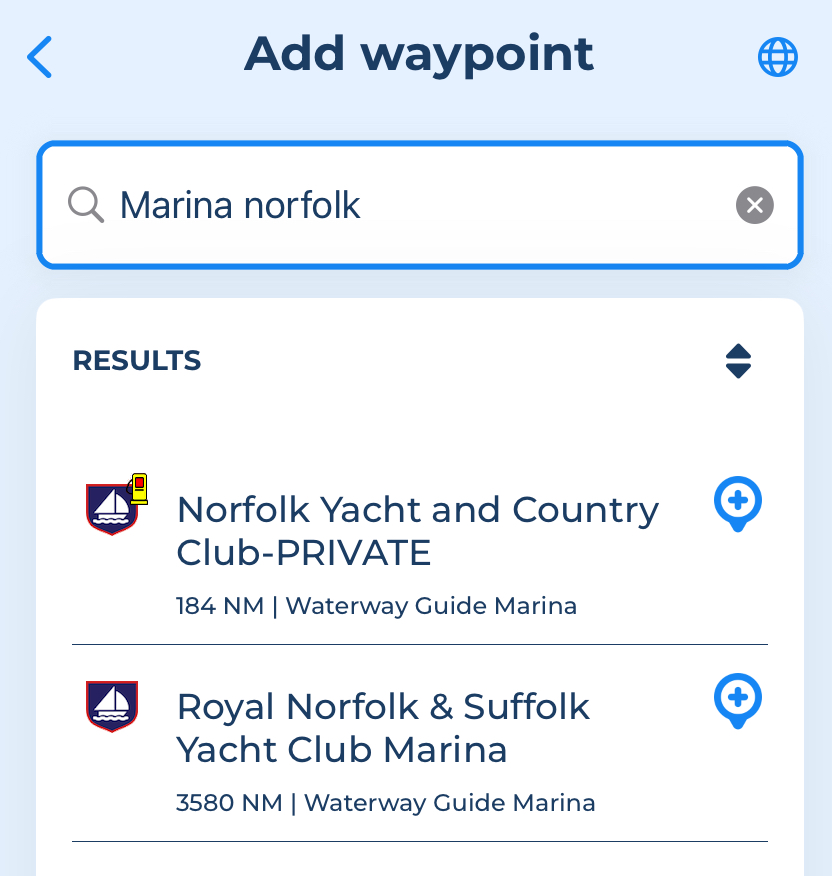
Within this page, you’ll find a globe icon ![]() in the top-right corner. This opens the Set Coordinates window, where you can manually enter the latitude and longitude for precise waypoint placement.
in the top-right corner. This opens the Set Coordinates window, where you can manually enter the latitude and longitude for precise waypoint placement.
In the list, for each item found you can:
- Tap on the row and the map will be center on the item..
- Select the Add Waypoint button
and the item will be inserted as last waypoint of the route.
Route Planner settings
On the main settings page, tap on the ‘Route Planner’ option to go into its page to set it up:
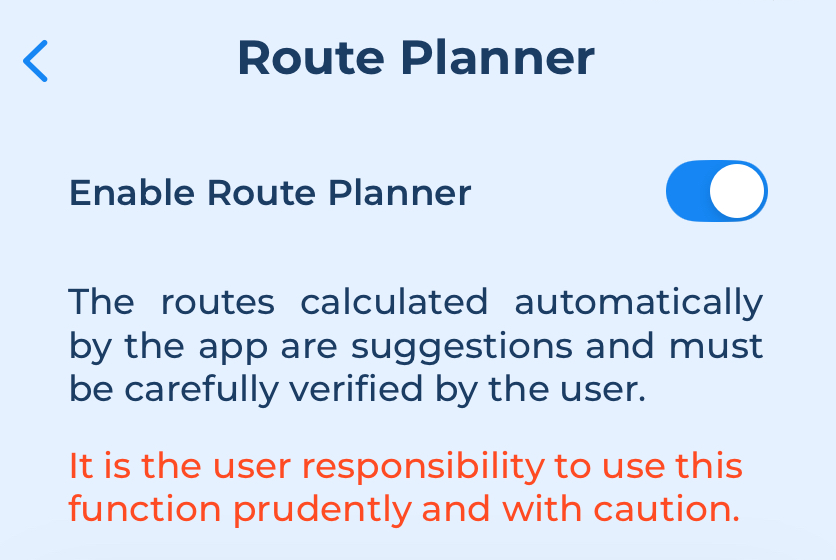
The first section enables the Route Planner function and informs the user of the importance of thoroughly checking the route before using it for navigation.
If you disable this function, you can still create and edit a route, but you do not have the option to select Auto mode and most importantly, you completely disable the hazards calculation. Therefore, with the Route Planner disabled, you will not see any hazard when editing and navigating a route.
The following sections allow you to configure the behavior of Auto mode and the parameters used for the hazard calculation
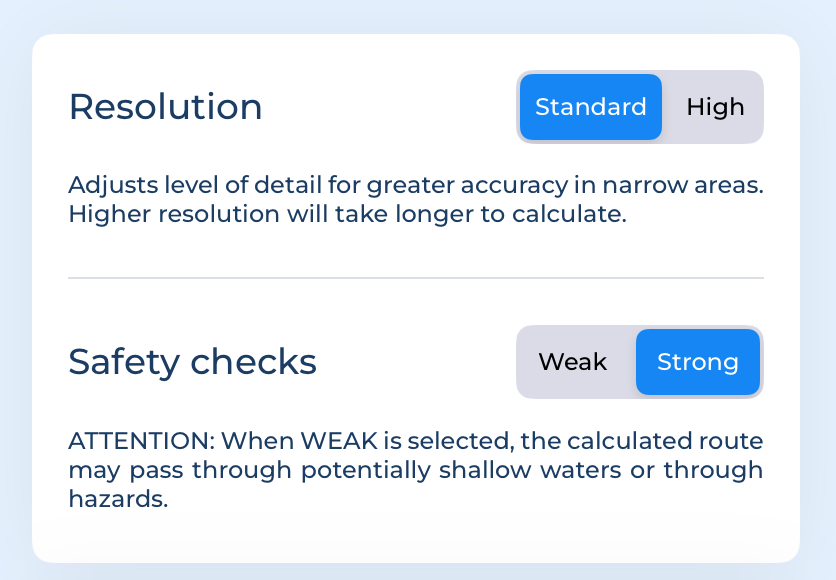
- Resolution: adjusts the level of detail used to calculate a route, allowing for more accurate paths through narrow channels.
- Standard is the most common option and is perfect for calculating a route in normal navigation areas.
- High resolution may be needed to cross particularly narrow channels or passages, but it will increase the time required for computation.
- Safety Checks: this defines the safety checks used to calculate your route by using the information you have added on the Additional Margins (see below) and My Boat parameters:
- If Strong is selected, the calculated route will pass only through safe areas (based on available map data).
- When Weak is selected, the calculated route may pass through potentially shallow waters or through hazards, so use this option very carefully.
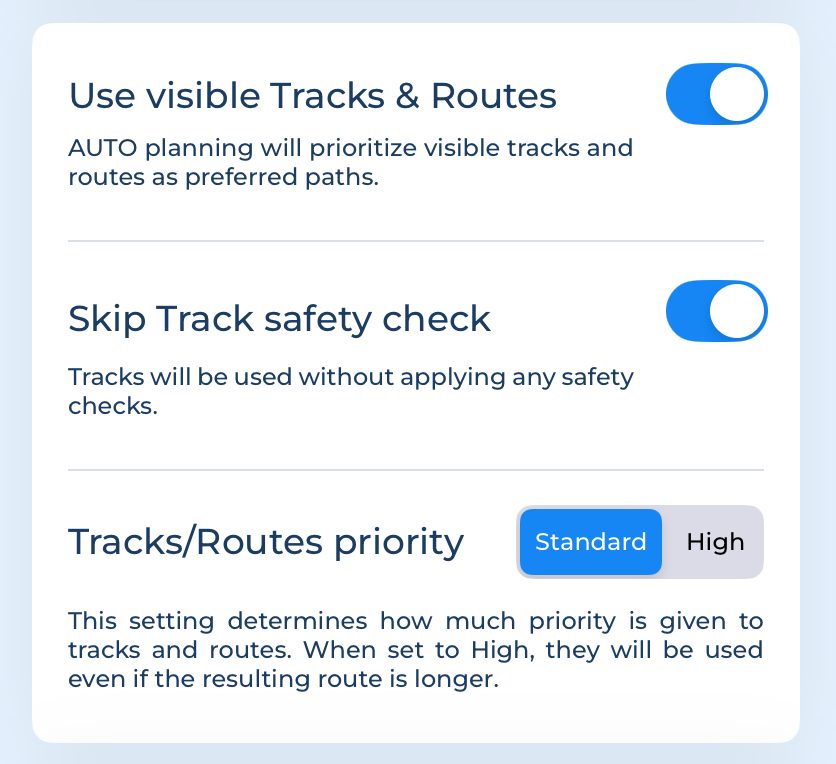
- Use visible Tracks & Routes: with Aqua Map, you can instruct the automatic route calculation to use the tracks and routes on your device as your preferred path. If you enable this option, the automatic mode will use all tracks and routes, currently set as visible, as the preferred route. Any tracks and routes can be used for this purpose, including imported ones (e.g. BOB423 tracks for the ICW area).
- Skip Track safety check: when you enable this option, the algorithm does NOT perform any safety checks on the tracks used. This allows you to use tracks that pass through dangerous areas, but it is recommended that you use this option only for tracks that are reliable for your type of boat.
- Track/Routes priority: here you can specify how much the algorithm should try to use the user's tracks and routes:
- Standard: uses the tracks or routes as a guide but if it finds a more effective path it will suggest it.
- High: uses the tracks or routes as a strict guide which can result in the creation of quite longer paths.
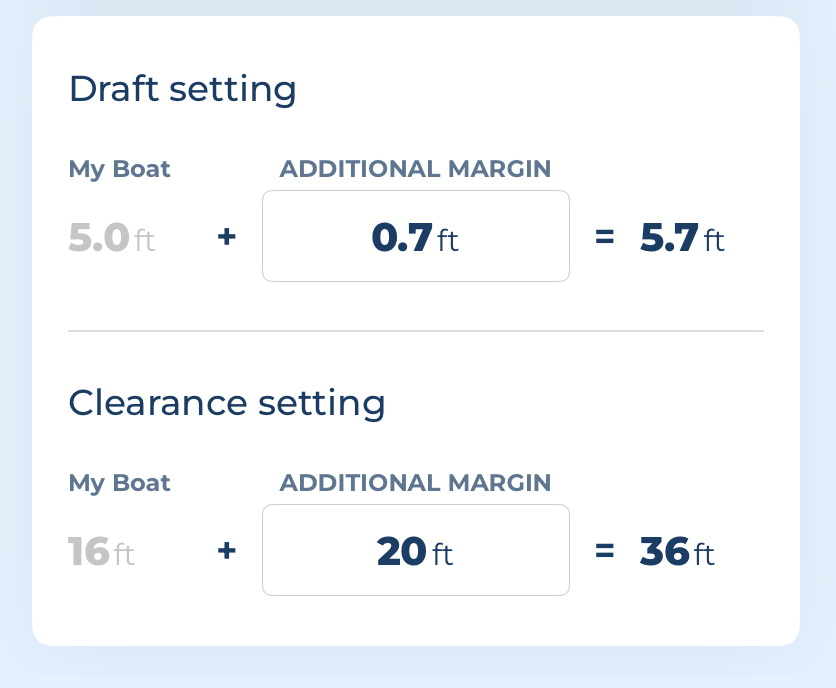
Here you can define any additional “safe” margin to be added to the draft and height of the boat set on the My Boat page (of course, it is important to enter the correct draft and height of the boat on the My Boat page before running the automatic route calculation).
- Draft setting: here you enter the extra margin to be added to the boat draft when checking the depth area ranges or any other depth info in the map (eg. obstructions, rocks, ...).
- Clearance setting: here you enter the extra margin to be added to the boat height when checking the passage under bridges, cables and any other suspended structure.
Local data settings
Aqua Map can use the local data information to improve the calculated path. The general rule is that Aqua Map uses for the Auto route calculation (and for the hazard) all the local data that are currently displayed on the screen.
So, for example, if the USACE Surveys are enabled, the Auto route calculation will use them and will use the same setting defined on the USACE surveys settings page for maximum age filtering. Conversely, if the design of USACE surveys is disabled, they will not be used in the calculation.

